When I first started in photography, I used aperture priority mode pretty much all the time. Later I learned the advantages of using manual exposure mode in certain situations. However, I still felt more comfortable using aperture priority mode and preferred using it when possible. Eventually I devised a method of using Auto Exposure Lock as a substitute for manual exposure mode. I wrote an article on the technique in 2011 that was published in Nikonians eZine, Number 51.
That article reviewed the merits of automatic and manual exposure modes, then described in detail how I use the Auto Exposure Lock Method as a substitute for manual exposure. If you photograph wildlife, sports or any other type of action photography, using Auto Exposure Lock has one big advantage over manual exposure. I’ve revised the article, adding more images and clarifying some points, and published it on this website.
Introduction
Over the years there has been a lot of discussion on nature photography forums about which exposure mode is best suited for photographing wildlife. The choices are either manual exposure or one of three automatic exposure modes: aperture priority, shutter priority, or program. Casual shooters and newcomers to photography often use only automatic modes. They are generally more than willing to have the camera help them with exposure settings. Experienced photographers tend to use manual exposure mode more often. Some photographers even claim to forego automatic modes altogether and use only manual exposure. The truth is there are advantages and disadvantages to each method and there are times when each can be useful. This article briefly reviews the merits of each exposure mode and then describes a method of auto exposure lock that I have been using since about 1993—when I modified my Nikon F4 to allow the exposure lock button to remain in the depressed position until manually released. I used this method until I retired my F4 in 2004 and switched to digital cameras. The method is much easier to use with Nikon digital SLR cameras because you can easily program the camera to remain in exposure lock status until the exposure lock button is pressed a second time. And if you take the time to read this somewhat long article, you’ll discover one big advantage that Auto Exposure Lock has over manual exposure for those photographers shooting wildlife, sports, or other types of action photography.
Note: The auto exposure lock method I describe should become clear as you read further, however, it is important to realize at the outset that I am discussing the use of exposure modes (manual, aperture-priority, shutter-priority, and program modes) and not metering patterns. Metering patterns determine how the camera’s light meter reads the scene to determine an exposure. The typical metering patterns for most cameras are spot metering, center-weighted metering and some form of evaluative metering (called matrix metering in Nikon cameras). Spot metering is a fairly specialized metering pattern used in certain specific instances. For the purposes of this discussion, we will assume that either center-weighted or matrix metering is being used. So, with metering pattern decided, we will now focus on exposure modes— which determine how the exposure variables (aperture and shutter speed) are actually set in the camera and , just as importantly, how these settings interact with changes in the camera’s light meter readings.
Note for Canon users: I use Nikon cameras exclusively and this article describes in detail how to use Auto Exposure Lock with Nikon cameras. However, it is my understanding that current top of the line Canon digital cameras (the 1D series and 5D Mark III) can also be programed to allow a retained auto exposure lock status.
Auto Exposure Lock, as I use it, provides the key feature that makes manual exposure mode so useful: the ability for the photographer to set exposure settings that the camera cannot override or change as it continually re-interprets the light reaching the meter. A second key feature is that although AE Lock prevents the camera meter from overriding the locked exposure settings, the photographer can still modify the settings with the exposure compensation dial. Finally, the method also offers some distinct advantages over manual exposure mode. If it didn’t, then there would be no reason to use AE Lock instead of manual exposure.
I was prompted to describe my method after reading John Gerlach’s May 2011 newsletter (no longer available online).
In it, he expressed his wish for cameras to have an exposure lock button for manual exposure mode:
“Once we have determined our exposure manually, we would like a way to lock the exposure combination we have set. Then we could quickly change the shutter speed or aperture and the camera could change the other one for us. We know the camera does this in automatic, but then we have to deal with all of the shortfalls that autoexposure entails such as changing background reflectances. It would be helpful to have a button on the camera to lock the manual exposure combination and then unlock it with a second push of the button.”
I agree that a manual exposure lock button would be useful. However, the auto exposure lock method can provide essentially the same benefits.
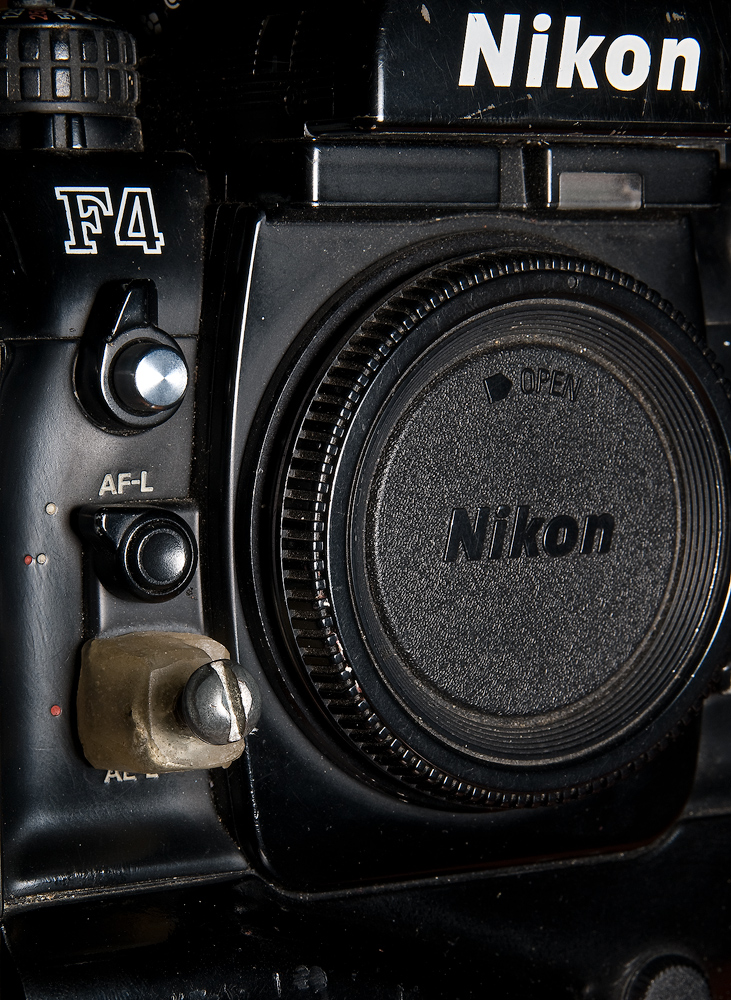
My modified Nikon F4S with custom-made acrylic mold in place on exposure lock button. A small rotation of the screw would hold exposure lock button in depressed position.
Discussion of Automatic and Manual Exposure Modes
Automatic Exposure Modes
In aperture-priority exposure mode, the photographer chooses the desired aperture setting and the camera automatically sets the shutter speed to match the exposure determined by the camera’s metering pattern. In shutter-priority exposure mode, the photographer sets the shutter speed and the camera automatically sets the aperture. In program modes, the camera automatically sets both aperture and shutter speed according to the metering pattern. The experienced photographer generally avoids program modes as he has no specific control over the actual selected exposure variables.
Depending upon the metering pattern selected, the tonality of the subject, and the overall tonality of the metered scene, the camera’s recommended exposure may be correct or require knowledgeable compensation (using the exposure compensation dial). Compared to the days of film, digital cameras make correct exposure easy to determine. Just check the exposure histogram after making an initial exposure. Adjustments can then be made to the exposure, if incorrect. The instant feedback provided by the histogram makes learning exposure methods much easier than in the past.
Automatic exposure modes are most useful in rapidly changing light conditions, such as the passing of clouds across the sun or the movement of a subject in and out of shadows. In these situations the camera meter continuously evaluates the scene and will automatically adjust the exposure settings as the light intensity changes. This will always be a much quicker response than a photographer can make in manual exposure mode.

This robin was feeding on earthworms that I tossed onto my front lawn. The bird would retrieve one or several worms, walk/hop across the lawn to the base of a dogwood tree, and then fly up to its nest. The afternoon sun was shining through trees and some areas of the lawn received full sun while other areas were partially lit or in full shade. By using an automatic exposure mode (aperture priority), matrix metering and fill flash, I was able to concentrate on focus and composition without worrying about estimating lighting changes and constantly making exposure adjustments. All images were satisfactorily exposed, with exposures varying by as much as 1 1/3 stops.
The biggest problem with automatic exposure modes is that, even with today’s modern computerized cameras, the cameras are not quite smart enough. The camera can misinterpret the changes in lighting and make an incorrect adjustment to the exposure settings. The resulting images will be either under- or over-exposed. The source of the problem is the fact that the camera meter evaluates reflected light rather than actual light intensity (incident light). The amount of light reaching the camera is dependent upon the tonality of the objects being metered. Light-toned objects reflect more light than dark-toned objects. When the changes in exposure settings are due to changes in light intensity, then the camera is making the right adjustments. However, if the variation is due to changes in the tonality of the scene, then the camera may well be making incorrect adjustments. A good example of the latter situation would be a bird in flight that, as it rises, shifts from a background of dark green vegetation to a bright-sky background. The result will be improperly exposed images of the subject since the same amount of light is illuminating the subject, yet the exposure will change significantly due to dramatic differences in background brightness.
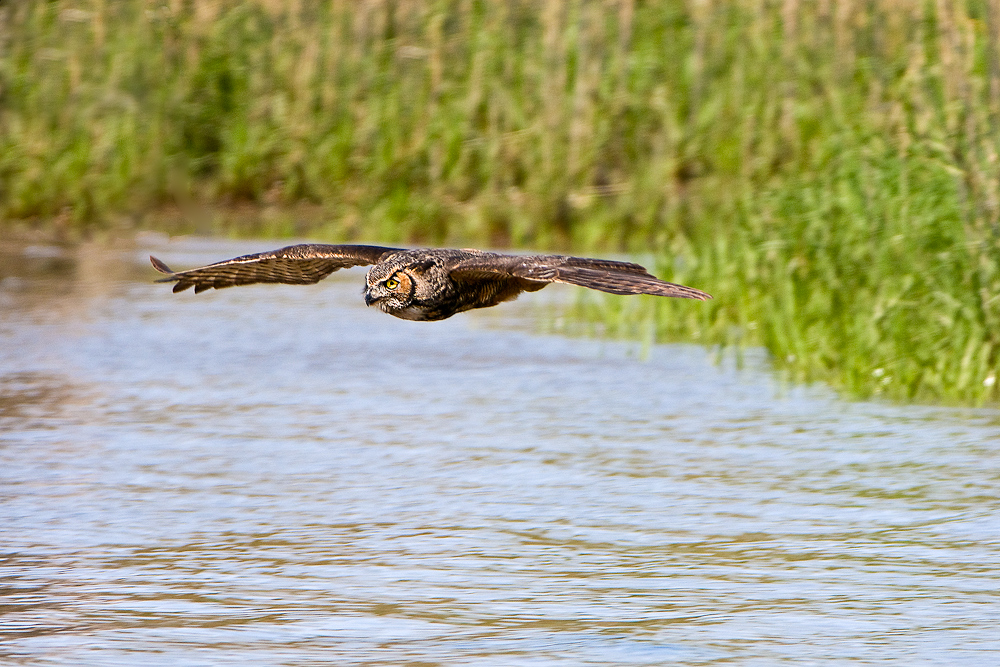
An automatic exposure mode might have problems maintaining correct exposure as this Great Horned Owl flew from the medium-toned green background to a background of water reflecting the brighter sky. Manual exposure would ensure that the subject would remain properly exposed.
Manual Exposure Mode
In manual exposure mode, the photographer sets both aperture and shutter speed. He can use an aperture and shutter speed combination that matches the camera’s recommended exposure or he can choose to ignore the camera’s advice and select an exposure combination that will give a darker or lighter image. As in automatic exposure mode, viewing the exposure histogram after an initial exposure allows the fine-tuning of exposure. With manual exposure, once the exposure settings (aperture and shutter speed) are made, they will not change unless the photographer makes a conscious decision to do so. There-in lies the big advantage of manual exposure mode. The photographer does not have to worry that the camera’s computer will reevaluate the lighting and possibly incorrectly change the exposure. The photographer alone decides when the exposure settings are to be changed.
Manual exposure mode is at its best in situations where light intensity is relatively constant yet the subject is moving through a scene of changing tonalities. With a bird in flight moving from dark to light background (discussed above), manual mode would ensure proper exposure of the subject.
Manual exposure is perfect for lighting conditions such as this one, where an evenly lit subject is moving within background areas that are either very bright or very dark. However, Auto Exposure Lock, as we’ll soon see, will perform equally well.
The problem with manual exposure is that in conditions of changing lighting intensity, the manual method does not allow the camera to automatically adjust exposure to compensate. The photographer must constantly evaluate light intensity and manually make exposure adjustments when the light level changes. When light intensity is changing fairly quickly, the adjustments can be cumbersome and possibly not quick enough for the situation. When you add the additional desire to make creative changes to depth of field or shutter speed as the light intensity is also changing, the adjustments get even more difficult and complicated.
To summarize: Manual exposure will ensure consistent exposures in conditions of unchanging light intensity. Automatic exposure will provide faster, automatic adjustment of the exposure when light intensity is changing.
Hypothetical Scenario
Let us consider a hypothetical situation where the light intensity is constant and scene tonality does not change during the entire shoot. In this ideal situation either manual or automatic exposure modes will work just fine. Proper exposure can easily be determined by either method, and the exposure will not change during the shoot since neither light intensity nor tonality change. In this hypothetical situation, does one mode offer any advantages over the other? I can’t think of any real advantage for manual exposure. Automatic exposure, however, does have a distinct advantage. If the photographer makes the creative decision to change either the aperture or shutter speed, automatic modes will be faster because exposure variables (aperture and shutter speed) are linked. A change in one will automatically result in the proper change in the other to maintain the exposure. For example, let’s suppose we are using aperture priority mode and photographing a wood duck on a pond when a second wood duck briefly enters the frame. You decide to change the aperture from f5.6 to 11 to get more depth of field. The change in aperture is made by rotating a single dial and the shutter speed is automatically adjusted. To do the same in manual mode requires the simultaneous adjustment of two dials– a 2-stop change in aperture in one direction and a two stop change in shutter speed in the opposite direction. And you have to count the clicks of the dial to make sure you are adjusting each the same amount. If you don’t, the exposure will be wrong. To continue the scenario, when the second wood duck leaves you can, in aperture priority mode, more quickly adjust back to the original aperture to throw the background into more pleasing soft focus.
In another example, you may be photographing a bird at rest and it suddenly takes flight. In aperture priority mode, you can easily make quick changes in shutter speed by adjusting only the aperture. Using the wood duck example again, suppose you are shooting in aperture priority at 1/250s at f8, and the wood duck suddenly shakes his head, stretches his neck, and gives a winnowing call. Realizing the duck is about to take flight, you can quickly adjust the aperture to maximum, say f4, the shutter speed will automatically shift to 1/1000s and you’re be ready for the flight shot. Manual exposure would require a nearly simultaneous 2-stop adjustment of aperture in one direction and a 2-stop adjustment in shutter speed in the opposite direction.
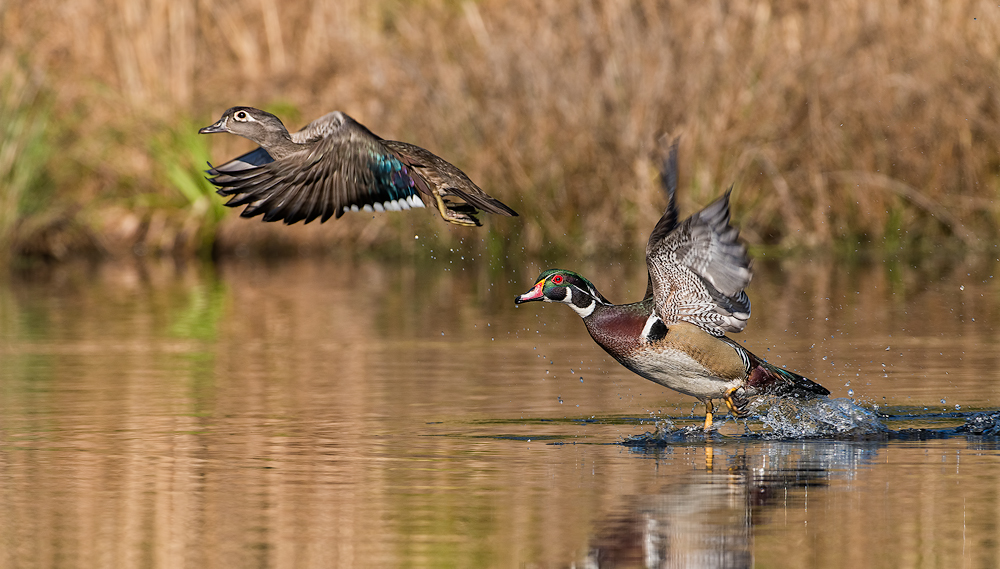
Just a moment before this image was taken, I was shooting at a smaller aperture for more depth of field (to ensure both ducks were in sharp focus). At the first signs of a possible take-off, I quickly rotated the aperture dial to the widest aperture to ensure a fast enough shutter speed to freeze the action.
Unfortunately the hypothetical scenario above does not happen often enough. Usually either the light intensity or scene tonality is changing. But the scenario does illustrate a couple of important points. First, both methods can easily be used to obtain an accurate exposure. And, second, automatic exposure has a significant advantage in speed. In fact, for the photographer knowledgeable about exposure, this speed of exposure adjustment is its only real advantage. Unfortunately, in the real world, automatic modes have a really big disadvantage compared to manual exposure. Tonalities often do significantly change as one pans the camera to different areas of a scene or zooms toward or away from a wildlife subject. It is a big enough disadvantage that many serious photographers will switch to manual mode when light levels are relatively constant. Manual mode’s big advantage over automatic exposure is that it is not affected by changes in scene tonality. The photographer does not have to worry about the camera making incorrect adjustments to exposure due to changes in tonality. Once set manually, the exposure will be correct until the light intensity changes.
Automatic Exposure Lock provides the major benefit of manual exposure mode–the ability to set an exposure that the camera cannot override–yet retains the ease of quick adjustments via the linked exposure variables (aperture and shutter speed) of automatic modes. One does not have to change exposure modes at all. In conditions of changing light intensity one can shoot in an automatic exposure mode such as aperture priority. However, if light levels stabilize, the simple press of the exposure lock button will gain the same advantages as switching to manual exposure mode.
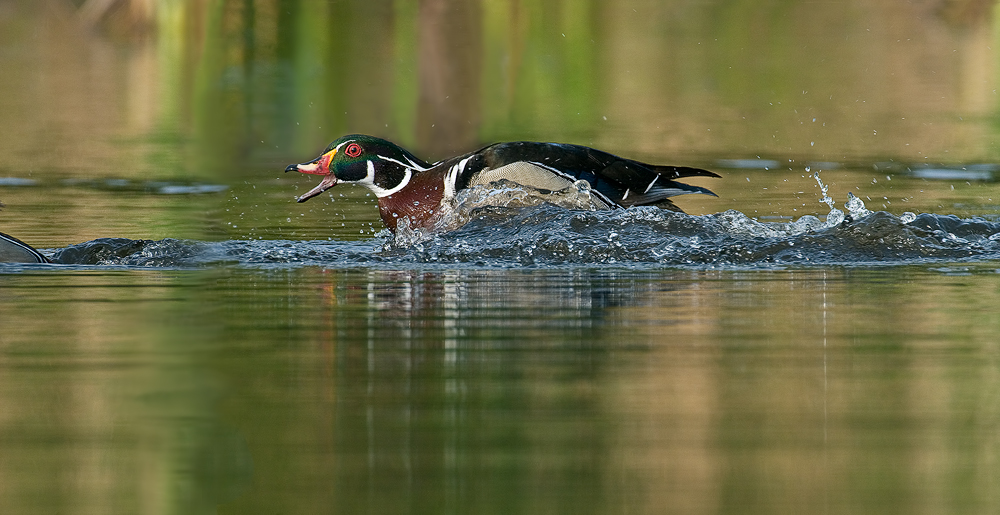
A second drake approached too closely to this one’s mate. The drake stretched his neck and made jabbing motions toward the intruder. Anticipating a chase, the use of aperture priority mode allowed a quick change of aperture from f11 to f5.6 to gain enough shutter speed to freeze the action. Since light intensity was fairly constant, I was also in automatic exposure lock at the time. The locked exposure ensured consistent exposures as the rushing duck passed through water reflecting background vegetation that varied from light brown to light and dark green.
D800 Automatic Exposure Lock Method
The method described below is specific to the Nikon D800. However, it is my understanding that all or most current Nikon DSLRs can be similarly programmed. The actual Custom Function number designations may vary from the D800, but the language of the menu settings should be similar.
To effectively use automatic exposure lock as a replacement for manual mode, you need to properly set three custom functions.
1) Set custom function b4, Easy Exposure Compensation to On). Easy exposure compensation eliminates the annoying and awkward necessity of having to press the +/- button when dialing in exposure compensation. The key advantage of AE Lock over manual exposure is the speed and ease of exposure adjustments. Using Easy Exposure Compensation is essential to maintain this ease of exposure adjustment. I generally shoot in aperture priority mode and Easy Exposure Compensation allows me to change the aperture with the front subcommand dial and dial in exposure compensation with the rear command dial.
2) Set custom function f6, Assign AE-L/AF-L Button, to AE Lock (Hold). At this setting, once pressed, the exposure will remain locked until pressed again or the camera enters standby mode (i.e the exposure meter turns off).
• Alternatively, either the D800 Function button or Preview button (custom functions f4 and f5) could be set to AE Lock (Hold) and serve as the exposure lock button.
3) Set custom function c2, Auto Meter-Off Delay, to No Limit. This setting keeps the camera meter active or in awake status and will keep the lock exposure settings in place. As noted above in 2), if the exposure meter does not turn off, then the exposure will remain locked until the exposure lock button is pressed again.
• Obviously this means the camera is continually using battery power, but I have not found that to be a problem in daily use. With the type of photography that I do, I rarely have a fresh battery fail to last through a day’s shooting. Now I don’t often travel to photo hot spots and shoot fast and furious all day. I also turn the camera off when not shooting for a period, and always have an extra battery ready for use.
In my photography I use normal aperture priority mode about 40% of the time. I use aperture priority with auto exposure lock about 60% (these are very rough estimates). I prefer to have the exposure locked when possible–whenever light intensity is relatively constant.
Here’s my approach when using auto exposure lock:
1) I meter the subject or a similar-toned scene with desired metering pattern (matrix, center-weighted or spot) and lock the exposure by pressing the AE-L/AF-L button. While locked, “AE-L” will be displayed in the viewfinder LCD. Note: the exposure remains locked during steps 2) and 3)
2) I make a test exposure and review the histogram to see if the image was overexposed or underexposed. I use the exposure compensation dial to adjust the exposure to capture maximum image data without clipping important highlight detail. Knowledge of your camera’s histogram scale will aid exposure adjustment. By noting where the leading highlight edge lies on the scale, I can pretty closely estimate the amount of exposure compensation needed.
Reminder: As mentioned earlier, although the exposure is termed “locked” when the exposure lock button is pressed, that is not actually true. The camera computer cannot change the locked exposure, but the photographer can—through the use of the exposure compensation dial.
3) If the light intensity changes during the shoot I simply change the exposure compensation. Sometimes I make another test exposure when I think the light has changed. Other times I don’t realize that the light has changed until I check the histogram of my most recent image. If the light levels begin to fluctuate more frequently, I exit AE Lock and return to normal aperture priority mode.
4) To return to normal aperture priority mode, press the AE-L/AF-L button to exit AE Lock status and then re-zero the exposure compensation dial.
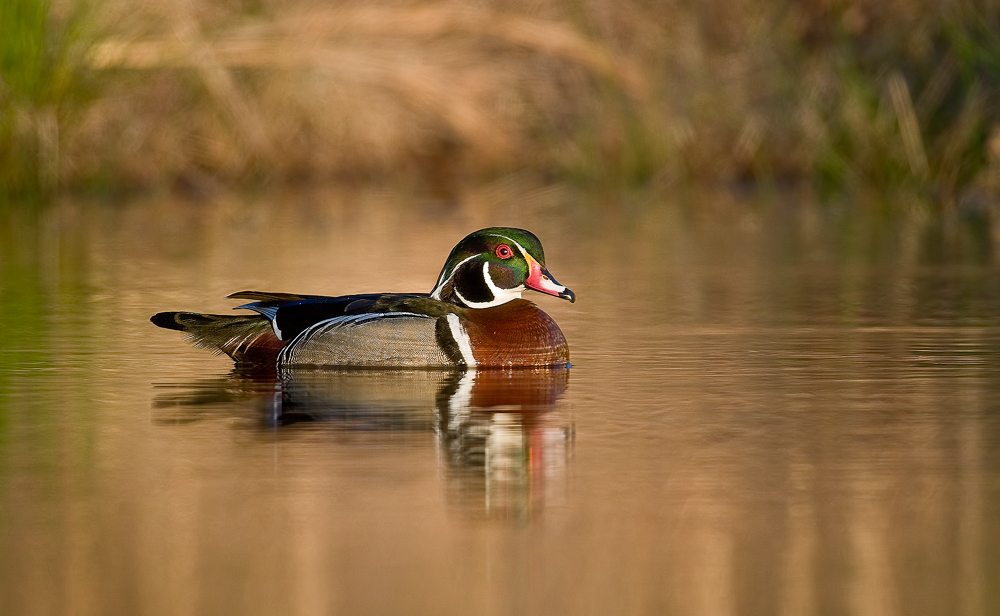
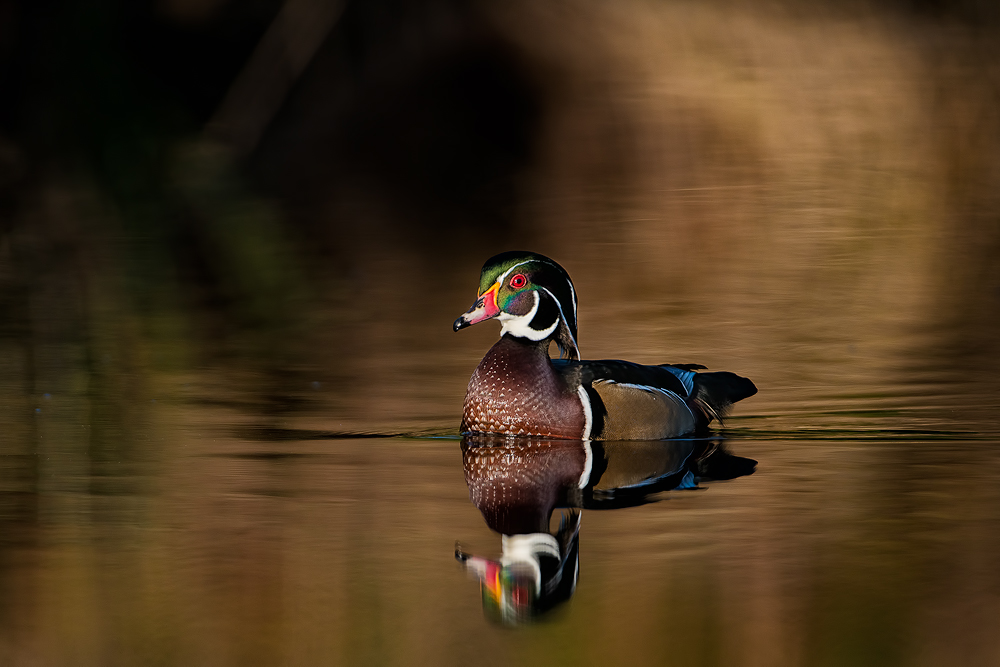
Wood ducks are difficult to expose because they contain both very light and very dark tones. I exposed as far to the right as possible in order to capture as much data in the dark tones as I could. Since the lighting was early morning full sun, I also used AE Lock. It ensured the subject exposure would stay the same (keeping my subject highlight and dark tones exactly where I wanted them) as the drake swam through areas of light and dark reflections. Had I used aperture priority without AE lock, some images would have had blown highlights while others would have recorded significantly less data in the dark tones than they could have. Using AE Lock rather than manual mode also enabled me to more quickly make changes to depth of field or shutter speed if the need suddenly arose.
Summary
The first SLR cameras had no internal light meters at all. Aperture and shutter speed were manually set to some predetermined exposure. Later internal light meters were added that allowed manual match-needle metering as the aperture and shutter speed were set manually. In the 1960’s automatic exposure modes became available on SLR cameras –where the camera would set one exposure variable (aperture or shutter speed) after photographer selected the other. The increased speed and flexibility in camera operation were welcomed by most photographers, but the advancement did come at a cost: giving up some exposure decision-making to the camera. And despite improvements in metering and exposure algorithms, cameras still often make the wrong decision. Manual exposure enables the photographer to remain in control of exposure. It prevents the camera from taking over and changing the exposure set by the photographer.
I recommend using Automatic Exposure Lock over manual exposure because:
- Auto Exposure Lock provides the same key benefit of manual exposure yet it retains the speed and flexibility provided by automatic exposure modes. Aperture and shutter speed remain linked. When the photographer selects one, the camera automatically selects the other to maintain the same exposure.
- The third exposure variable, ISO, is also linked in AE Lock. In aperture priority mode, a change in ISO will change the shutter speed to maintain the locked exposure. Similarly, in shutter priority, a change in ISO will result in a change in aperture. In manual exposure mode, if you change the ISO, you’ll need to make a manual adjustment to aperture or shutter speed to maintain exposure.
- The use of AE Lock keeps photography simpler. One doesn’t have to worry about switching exposure modes or using camera dials differently. I work in aperture priority mode at least 98% of the time. Instead of having to switch over to manual mode to “lock” exposure, I simply press the exposure lock button. Keeping things simple helps me avoid making mistakes in the heat of the moment of fast action. I think this advantage is particularly important to the serious amateur (such as myself) who photographs sporadically – usually on week-ends, more or less frequently at certain times of the year, with occasional lay-offs of several weeks.
- Automatic exposure modes also enable you to be always ready for sudden photographic opportunities. At the start and end of every shoot, I try to make sure my camera is in aperture priority mode, at widest aperture, exposure compensation zeroed, and ISO 400 selected. Whether my camera is on a tripod slung over my shoulder or on a pillow on the passenger seat of my car, these settings allow the opportunity for a quick shot if an sudden opportunity presents itself. In manual exposure, you would have to take time to meter and adjust settings.
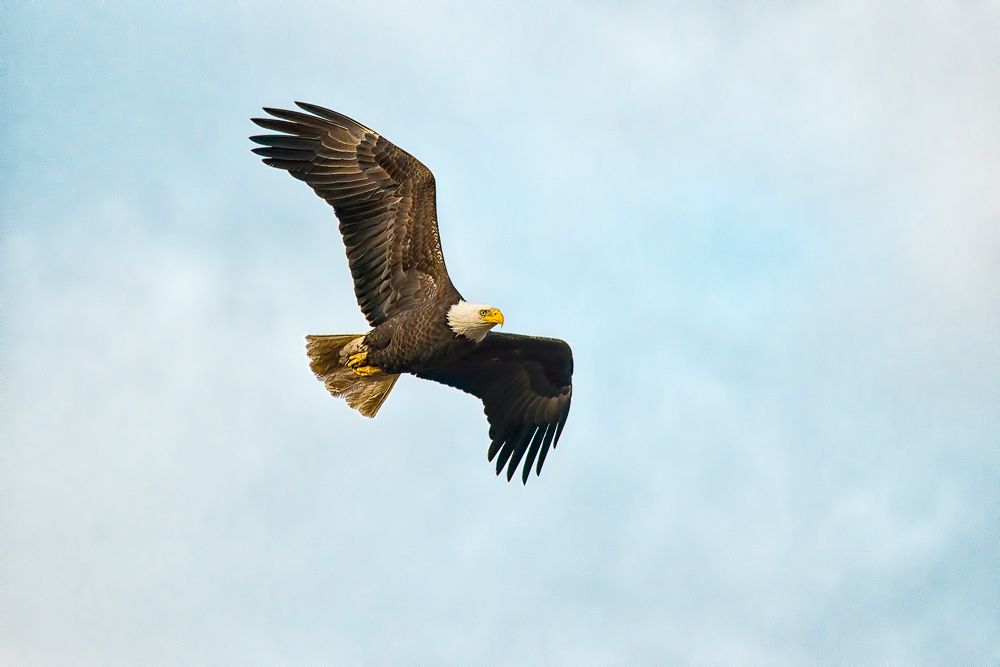
I saw this bald eagle perched in a tree by a dirt road at Pocosin Lakes NWR. I stopped my car to decide on an approach just as it was flushed by a truck coming from the other direction. It flew directly toward me and I had just enough time to grab my Nikon D800 with mounted Sigma 150-500 and take two images. This image would not have been possible had I not had my camera preset in aperture priority mode.
- An additional minor benefit of AE Lock is that, just like manual exposure, it eliminates the problem of bright ambient light entering the viewfinder and affecting exposure when your eye is not at the viewfinder. If I’m doing close-up photography with a tripod and electronic release, I press the exposure lock button to lock the exposure. Then I don’t have to close the viewfinder shutter.
One potential drawback to the use of AE Lock is the continual battery drain that occurs while the camera is turned on. I haven’t found it to be a problem in my photography. Another potential disadvantage is the fact that you have to assign one of your programmable buttons to AE Lock, thus precluding that button’s use for another function.